


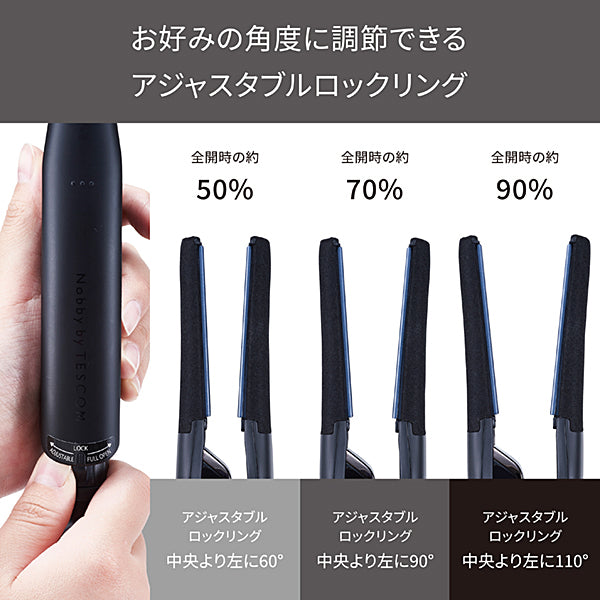
(Backordered) TESCOM Professional Arrange Iron NIS300A-K (Black)
(Backordered) TESCOM Professional Arrange Iron NIS300A-K (Black)
TESCOM
Regular price
£111.00 GBP
Regular price
Sale price
£111.00 GBP
Shipping calculated at checkout.
- Sourced in Japan, delivered to you
- Free shipping over $60 USD
- 100% authentic, always the latest
Couldn't load pickup availability
Description
Description
Ingredients
Ingredients
How To Use
How To Use


-
(Backordered) Dior Diorshow 5 Couleurs (170 Midnight Glitter Limited Edition)
Vendor:DiorRegular price £99.00 GBPRegular price -
(Backordered) Dior Diorshow 5 Couleurs (855 Rose Moiré Limited Edition)
Vendor:DiorRegular price £99.00 GBPRegular price -
(Backordered) Dior Diorshow 5 Couleurs (964 Lilac Tulle Limited Edition)
Vendor:DiorRegular price £99.00 GBPRegular price -
(Backordered) Dior Miss Dior Body Scrub (Limited Edition), 175ml
Vendor:DiorRegular price £92.00 GBPRegular price -
ANGFA Eyelash Serum Premium, 4ml
Vendor:ANGFARegular price £38.00 GBPRegular price£44.00 GBPSale price £38.00 GBPSale -
ANGFA Eyelash Serum Pure, 6ml
Vendor:ANGFARegular price £24.00 GBPRegular price£30.00 GBPSale price £24.00 GBPSale -
Canmake Creamy Touch Liner (01 Deep Black)
Vendor:CANMAKERegular price £16.00 GBPRegular price£20.00 GBPSale price £16.00 GBPSale -
Canmake Creamy Touch Liner (02 Medium Brown)
Vendor:CANMAKERegular price £16.00 GBPRegular price£20.00 GBPSale price £16.00 GBPSale -
Canmake Creamy Touch Liner (03 Dark Brown)
Vendor:CANMAKERegular price £16.00 GBPRegular price£20.00 GBPSale price £16.00 GBPSale -
Canmake Creamy Touch Liner (04 Garnet Burgundy)
Vendor:CANMAKERegular price £16.00 GBPRegular price£20.00 GBPSale price £16.00 GBPSale -
Canmake Creamy Touch Liner (09 Darjeeling Pink)
Vendor:CANMAKERegular price £16.00 GBPRegular price£20.00 GBPSale price £16.00 GBPSale -
Canmake Creamy Touch Liner (11 Cloudy Gray)
Vendor:CANMAKERegular price £16.00 GBPRegular price£20.00 GBPSale price £16.00 GBPSale -
Canmake Creamy Touch Liner (15 Cappuccino Pink)
Vendor:CANMAKERegular price £16.00 GBPRegular price£20.00 GBPSale price £16.00 GBPSale -
CANMAKE Creamy Touch Liner (16)
Vendor:CANMAKERegular price £16.00 GBPRegular price£20.00 GBPSale price £16.00 GBPSale -
Canmake Creamy Touch Liner (No.06 Foggy Plum)
Vendor:CANMAKERegular price £16.00 GBPRegular price£20.00 GBPSale price £16.00 GBPSale -
Canmake Creamy Touch Liner (No.07 Azuki Brown)
Vendor:CANMAKERegular price £16.00 GBPRegular price£20.00 GBPSale price £16.00 GBPSale -
Canmake Creamy Touch Liner Sheer ([40th] True Red)
Vendor:CANMAKERegular price £16.00 GBPRegular price£20.00 GBPSale price £16.00 GBPSale -
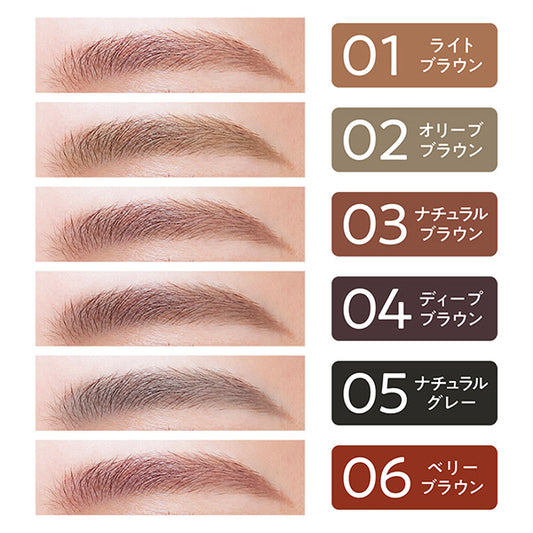
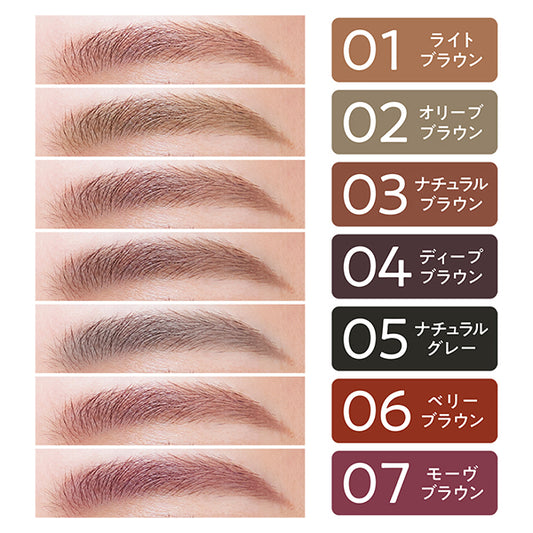
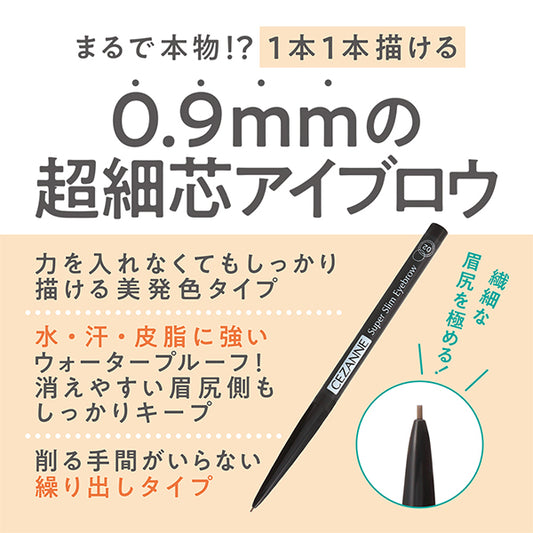
CEZANNE Ultra-Fine Eyebrow (01 Light Brown)
Vendor:CEZANNERegular price £15.00 GBPRegular price£19.00 GBPSale price £15.00 GBPSale -
CEZANNE Ultra-Fine Eyebrow (02 Olive Brown)
Vendor:CEZANNERegular price £15.00 GBPRegular price£19.00 GBPSale price £15.00 GBPSale -
CEZANNE Ultra-Fine Eyebrow (03 Natural Brown)
Vendor:CEZANNERegular price £15.00 GBPRegular price£19.00 GBPSale price £15.00 GBPSale -
CEZANNE Ultra-Fine Eyebrow (04 Deep Brown)
Vendor:CEZANNERegular price £15.00 GBPRegular price£19.00 GBPSale price £15.00 GBPSale -
CEZANNE Ultra-Fine Eyebrow (05 Natural Gray)
Vendor:CEZANNERegular price £15.00 GBPRegular price£19.00 GBPSale price £15.00 GBPSale -
CEZANNE Ultra-Fine Eyebrow (06 Berry Brown)
Vendor:CEZANNERegular price £15.00 GBPRegular price£19.00 GBPSale price £15.00 GBPSale -
CEZANNE Ultra-Fine Eyebrow (07 Mauve Brown)
Vendor:CEZANNERegular price £15.00 GBPRegular price£19.00 GBPSale price £15.00 GBPSale -
(Backordered) CEZANNE Ultra-Fine Eyebrow (08 Bitter Greige)
Vendor:CEZANNERegular price £15.00 GBPRegular price£19.00 GBPSale price £15.00 GBPSale


![Canmake Creamy Touch Liner Sheer ([40th] True Red)](http://suzykirei.com/cdn/shop/files/377722_1_506e9efe-e47c-4cfe-bdee-a65c791c06b9.jpg?v=1773546528&width=533)


New to J-beauty? Start here!
-

Beauty Awards
Award-winning beauty products that are genuinely popular in Japan — not just...


